Organizations
Run mail for many accounts from one organization, with one balance, shared members, shared templates and combined reports.
Overview
An organization groups many accounts under one balance, one set of members and one set of templates. Each location or brand keeps its own account. The organization funds, staffs and measures them from one place.
You can use Organizations to:
- Fund your accounts from one organization balance.
- Invite people once, and give them access to every account or to some accounts.
- Share approved templates with your accounts.
- See analytics, transactions and orders across all your accounts.
The organization has its own app. To open it, click Switch app at the foot of the left navigation, then click Organization. You can also click Settings > Organization > Open organization.
The left list of the Organization app holds Manage Organization, Templates, Members, Billing, Payments, Analytics and Reporting. Settings is at its foot.
Only an organization Admin can move money, add accounts or manage members. An organization User can view the organization.
Create an organization
Create an organization when you run more than one account. Organizations are available on the Enterprise plan.
Click Settings, then click Organization.
Click Create organization. The Create organization form opens.
In Organization name, enter the name, for example Acme Corp.
Optional: Enter the Business website, and select the Industry.
Under How should this account pay?, select an option. The options are in the table below.
Click Create Organization.
| Option | What it does |
|---|---|
| Keep this account credit-based | The account has no payment method of its own. It spends its balance. When the balance runs out, it needs a transfer from the organization. This is the default. |
| Set up a new payment method for this account | The account gets a new payment method. You add it in the organization's Billing. Nothing changes until the new method can be used. |
LettrLabs shows "Creating your organization" for a few seconds. You're done when "Organization created" shows. When you selected a new payment method, "Add the new payment method" shows. Add the method, and the creation finishes on its own.
Buy balance for the organization
Buy balance to fund the organization wallet. You can then move it to your accounts.
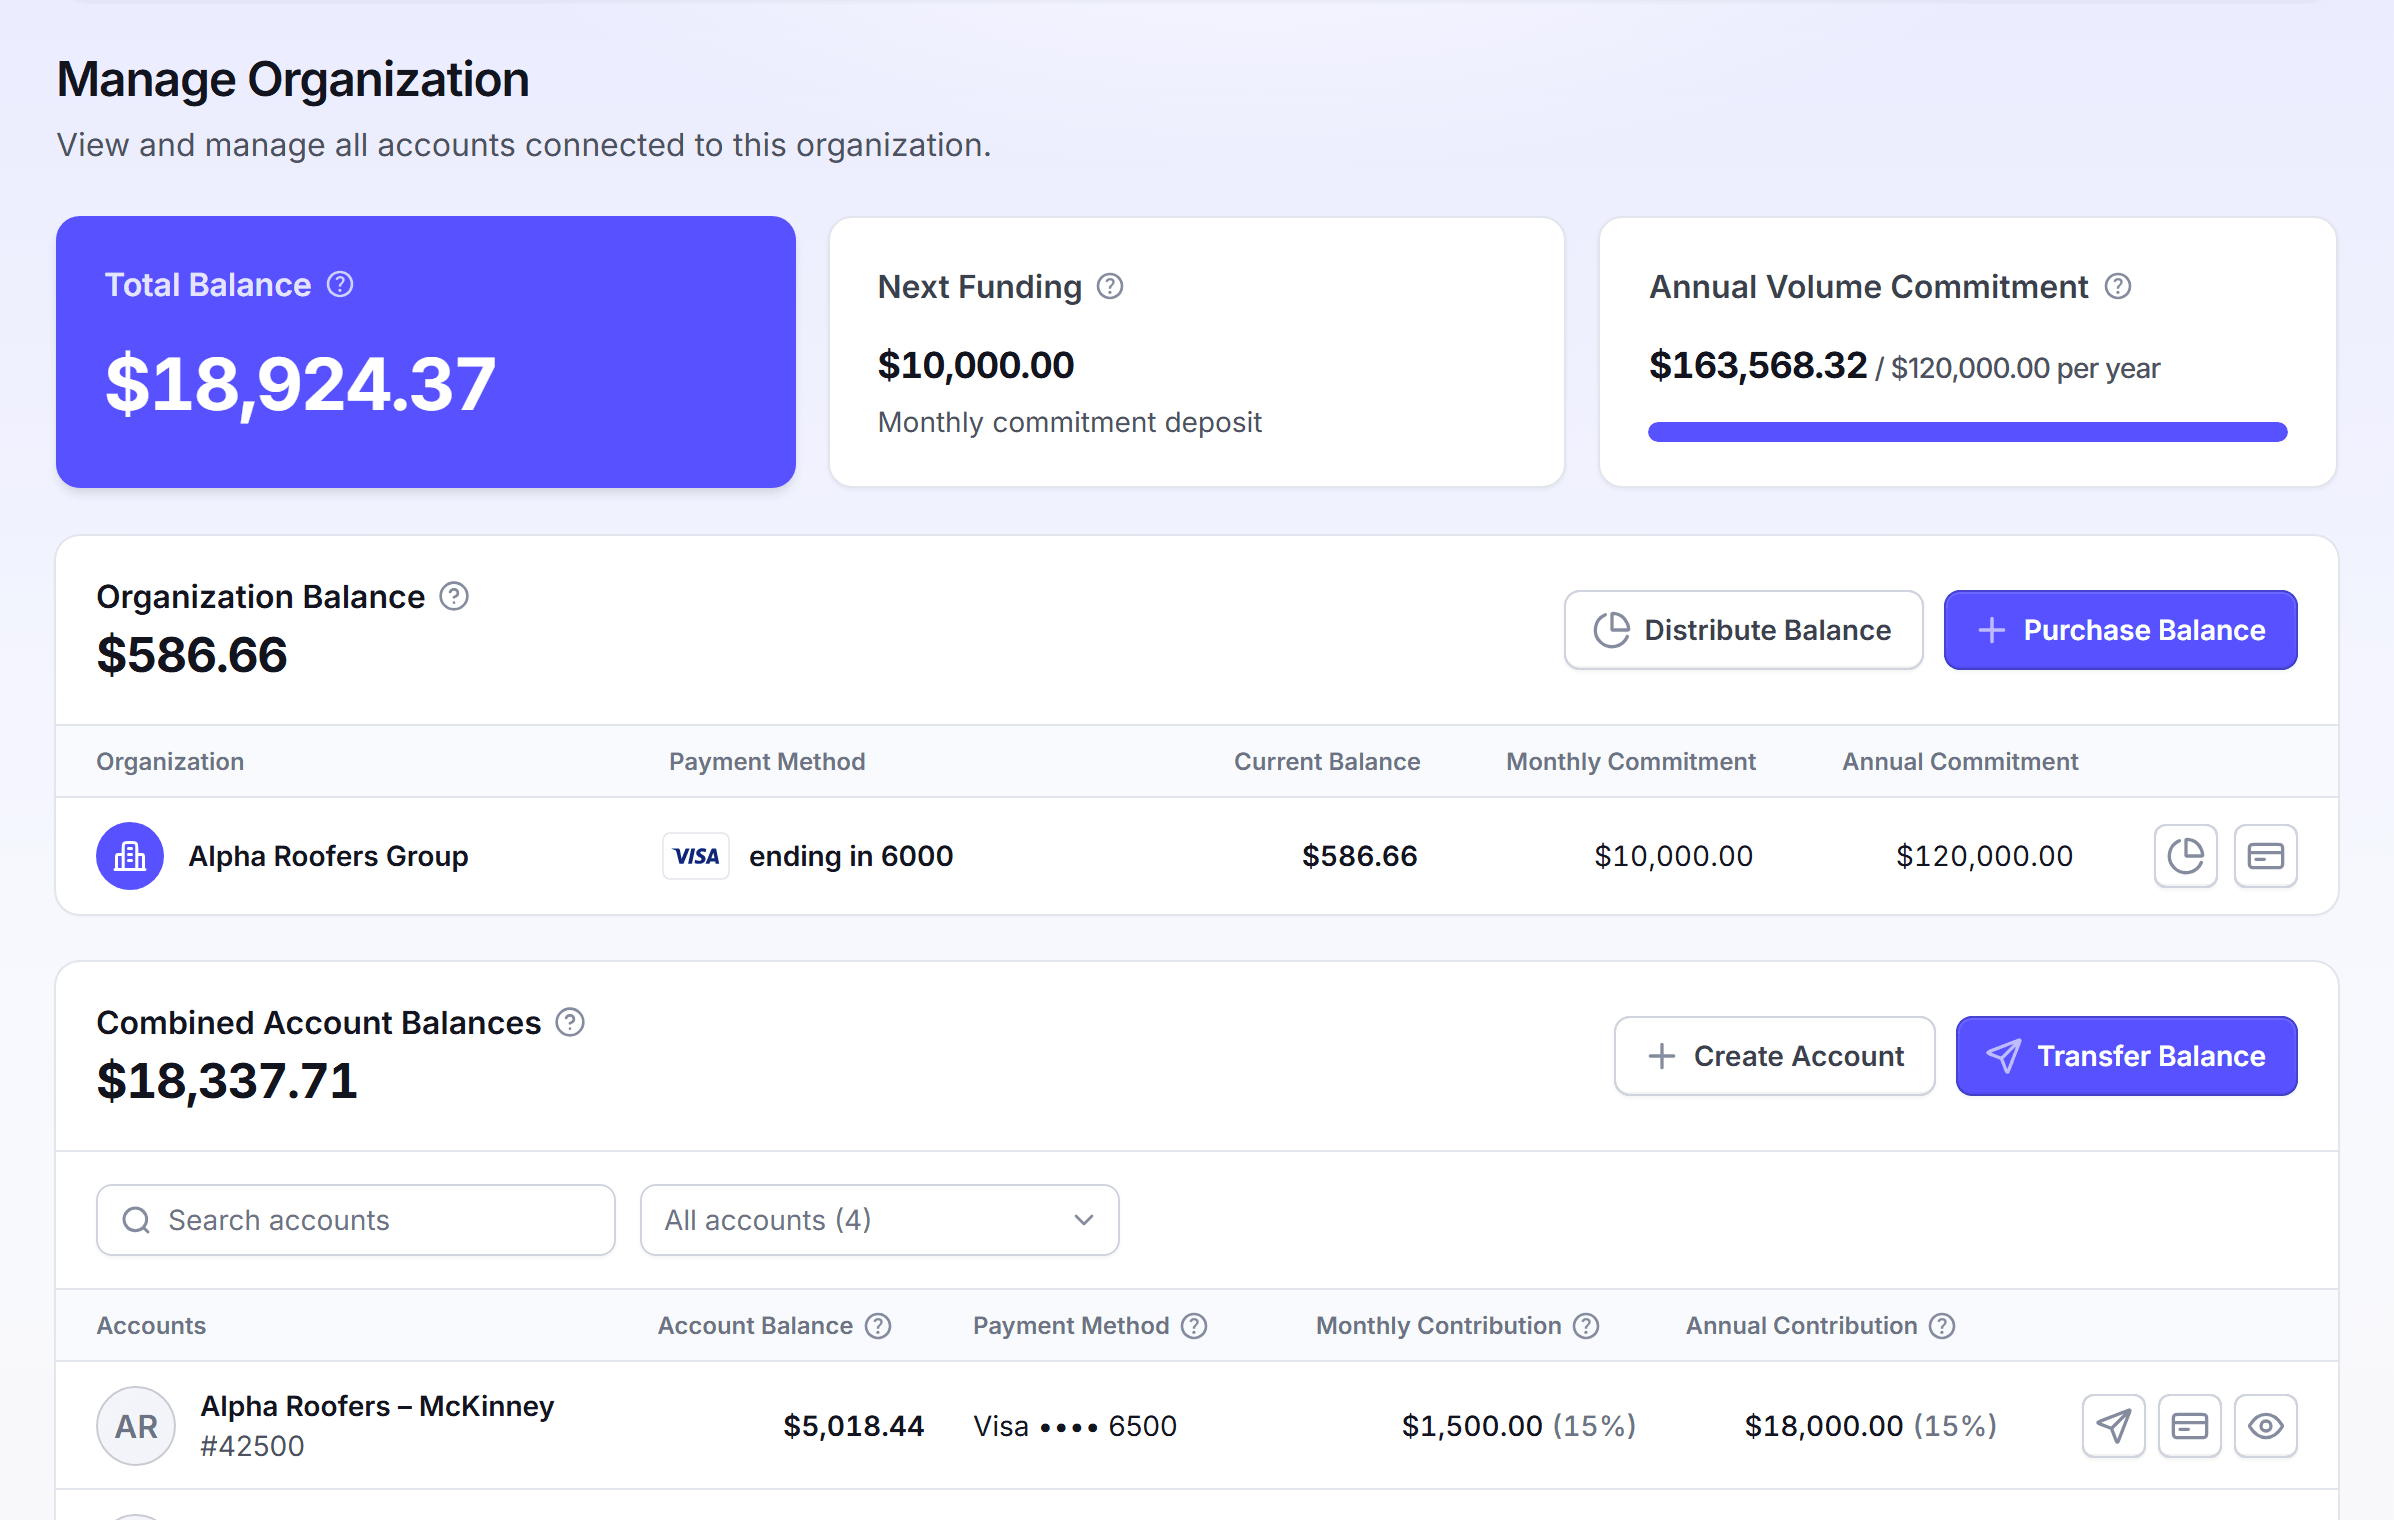
In the Organization app, click Manage Organization.
On the Organization Balance card, click Purchase Balance.
In How much do you want to purchase?, enter the amount.
Click Buy Balance. The Purchase Balance? dialog shows the amount and the payment method.
Click Buy Balance again to confirm. If your bank asks, complete the card check in Verify Your Card.
When the organization has no default payment method, click Add a payment method in the dialog first.
You're done when the message says the amount was purchased. The balance shows on the organization wallet shortly. A bank payment shows when it clears.
Move balance to or from an account
Move balance when one account needs more funds, or when you want unused funds back.
In the Organization app, click Manage Organization.
Under Combined Account Balances, click Transfer Balance. Or click the Change balance icon on the row of the account.
Select the account.
To pull funds into the organization, click Swap. The direction then reads Into organization balance.
Select Percentage % or Fixed Amount $, then enter the Amount to transfer.
Check the Summary Balance, then click Transfer Balance.
In the Transfer Balance? dialog, click Transfer Balance.
You can move only an amount that the source balance holds. You're done when the message reads, for example, "Moved $500.00 from the organization balance to Summit Home Services." You can move the funds back with a second transfer.
Distribute balance to many accounts
Distribute balance to fund many accounts at once. You can distribute one time, or set a policy that runs each month.
In the Organization app, click Manage Organization.
Click Distribute Balance. Select One-Time Distribution or Monthly Distribution.
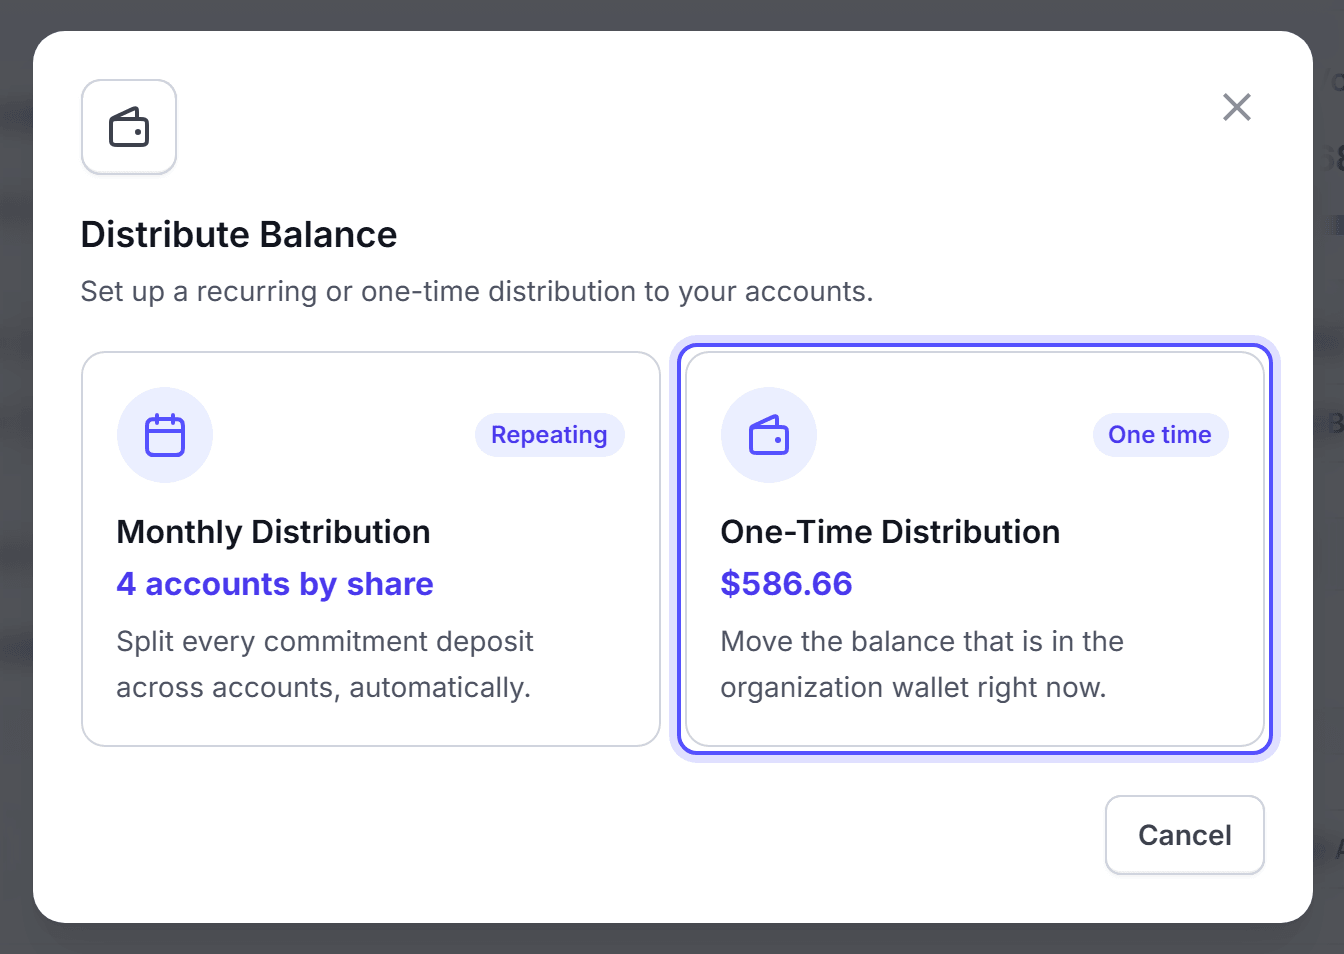
For a one-time distribution, select Send to accounts or Pull from accounts. Add an account and an amount on each line. Then click Review distribution, and click Distribute Balance.
For a monthly policy, select Percentage % or Fixed Amount $. Add an account and a value on each line. Then click Set up distribution.
To fill the lines fast, use Split Evenly or Match 90-Day Usage. Clear empties the amounts.
A one-time distribution applies as one group. When one account has too little balance, no balance changes. You're done when the message reads, for example, "Distributed $1,000.00 from the organization balance across 4 accounts."
A monthly policy splits each commitment deposit into the organization wallet. It runs on the 1st of each month. The rest stays with the organization. You're done when "Automatic distribution is set up." shows. To plan a different split for each month, click Configure Annual Distribution, then click Save Schedule.
Set how each account is charged
Set what happens when the balance of an account runs out. You can set one rule for all accounts, or a rule for each account.
In the Organization app, click Payments.
Select Organization & all accounts or Set up account by account.
Select an option for the organization, or for each account. The options are in the table below.
For Maintain a prepaid balance, enter the Top-off amount. It is a whole number of dollars, from 50,000.
Click Save Changes. If the change applies to every account, click Yes, Save in the Apply to Every Account? dialog.
| Option | What it does |
|---|---|
| Maintain a prepaid balance | When the balance runs out, LettrLabs charges the card at least the top-off amount. |
| Charge each order | When the balance runs out, LettrLabs charges the card only the shortfall. |
| Never charge the card | When the balance runs out, the campaign fails. LettrLabs makes no charge. |
You're done when "Auto-billing settings saved." shows. An account can also change its own setting. The last change wins.
Create an account in the organization
Create an account for a new location or brand. The account joins the organization on its plan, and it skips onboarding.
In the Organization app, click Manage Organization.
Under Combined Account Balances, click Create Account.
Enter the Account name. Optional: enter the Website, the Industry and the Default return address.
Click Create Account.
LettrLabs shows "Creating the account" while it sets up the account. You're done when "Account created" shows. The account then shows in the accounts table.
Manage an account's payment methods
Set which method pays for each account, from the organization. You do not have to open the account.
In the Organization app, click Manage Organization.
Click the Payment methods icon on the row of the account.
For an account with no saved method, select Organization balance or Payment method in Choose Default Funding Method. Then click Save Default.
For an account with saved methods, click Change beside a charge under What each method pays. Select the method, then click Update.
To add a method, click Add New. Select Credit Card or Pay by Bank, then complete the form.
To change the method of the organization itself, click the Change payment method icon on the organization row.
You're done when "Payment method added." or "Default payment method saved." shows. The account sees the same methods in its own billing settings.
Invite and manage members
Invite people once, and give them access to the whole organization or to some accounts.
In the Organization app, click Members.
Click Invite member.
In Emails, enter one or more addresses. Separate them with commas.
Under Role, select User or Admin.
Under Invite to, select Organization or Specific accounts. For specific accounts, select the accounts.
Click Send invitations.
An Admin manages billing and members. An organization Admin administers every account. A User does operational work, and cannot control billing or manage members.
You're done when Invitation results shows "Sent" for each account. A failed account changes nothing on the others.
The Members page has three tabs: Organization members, Account members and Accounts. To change a member, open the options menu on the row. You can change the role, or click Remove from organization. For a pending invitation, you can click Resend invitation, Re-invite as the other role, or Cancel invitation.
Group accounts
Group accounts to keep a long list in order, for example by region. A group does not change who can see an account.
In the Organization app, click Members, then click the Accounts tab.
Under Ungrouped accounts, select two or more accounts.
Click Create group from and the number of accounts.
In Group name, enter a name, for example Home Services.
Click Create group.
To change a group, open its options menu. Click Rename group, Create subgroup, Move group… or Delete group. You can delete only an empty group.
You're done when the message reads, for example, "Created Home Services with 3 accounts."
See wallets, transactions and orders
See where the money of the organization went. Each member can see this page.
In the Organization app, click Billing.
Click a tab: Wallets, Transactions or Order History.
On Transactions, filter by account, type, credit or debit, and date. Click Export to download the rows.
On Order History, find the order. Click View receipt to see its receipt.
Each transaction shows a tag: Purchase, Transfer, Distribution, Balance pull or Auto distribution. You're done when the table shows the rows that you need. This page changes nothing.
Manage Organization also shows the Annual Volume Commitment and the Next Funding when the organization has a spend commitment.
See analytics across your accounts
Compare the results of your accounts on one page.
In the Organization app, click Analytics.
Optional: Filter by account and by campaign. Select No grouping, Campaign type or Account.
Read Revenue, ROAS, AOV, Recipients, Conversion Rate and Campaigns.
To save the data, click Download, then click Campaigns (CSV) or Summary (CSV).
The figures come from the same source as the Attribution page of each account. For custom reports across all accounts, click Reporting. It is the same Reporting page, at the organization level.
You're done when the figures show the accounts and the campaigns that you selected.
Share templates with your accounts
Make a template once, approve it, and let your accounts use it.
In the Organization app, click Templates.
Click New Template. Select the product, then design the card.
On Proofs, check each side. Select I approve this template design., then click Continue to details.
Enter the Template name, and select the Strategy and the Use case.
Under Who can use this template, select Entire organization or Specific accounts.
Click Save Template.
On the template card, click Approve. In the review, click Approve template, then confirm.
Each template card shows its last modified date. Use Sort by to order the templates. The options are Last modified date, Created date and Name (alphabetical). The default is Last modified date.
A template shows Draft, Pending or Approved. Your accounts can use only an Approved template. You're done when "Template approved" shows. To stop sharing, click Unapprove.
FAQ
Related
Work across accounts
Switch between the accounts you can open.
Payment methods
Add the card or bank account that pays for your mail.
Templates
Design the cards that your accounts send.
Steps checked 2026-11-16.