Partner programs
Join a partner program to get its benefits, or run a program that gives templates, playbooks and co-op reports to your partners.
Overview
A partner program connects a brand with the dealer accounts that sell its products. The brand runs the program. Each dealer account joins with its own consent and keeps full control of its account.
You can use partner programs to:
- Join a program, and get its pricing, templates and playbooks.
- See which programs your accounts joined, and what each program can see.
- Run a program: invite partners, publish playbooks and read the program snapshot.
- Download the weekly reimbursement file, and set up the page where partners sign up.
LettrLabs sets up each program. A person who runs a program opens it from Switch app at the foot of the sidebar, then clicks Partner Program.
Join a partner program
Join a program when a brand sends you an invitation email or a sign-up link. You must administer the account that joins. An organization cannot join as a partner.
Open the link from the invitation email, or the program's sign-up link.
Click Continue. If you have no LettrLabs user, click Create my account. If you have one but are not signed in, click Already use LettrLabs? Log in.
Under Which accounts are joining?, select each account that joins. Then click Continue.
To join with a new account, click Join with a new account. Enter the Company name and, optionally, the partner ID that the program gave you.
Read what the program asks for. The two grants are Attribution analytics and Transaction reporting.
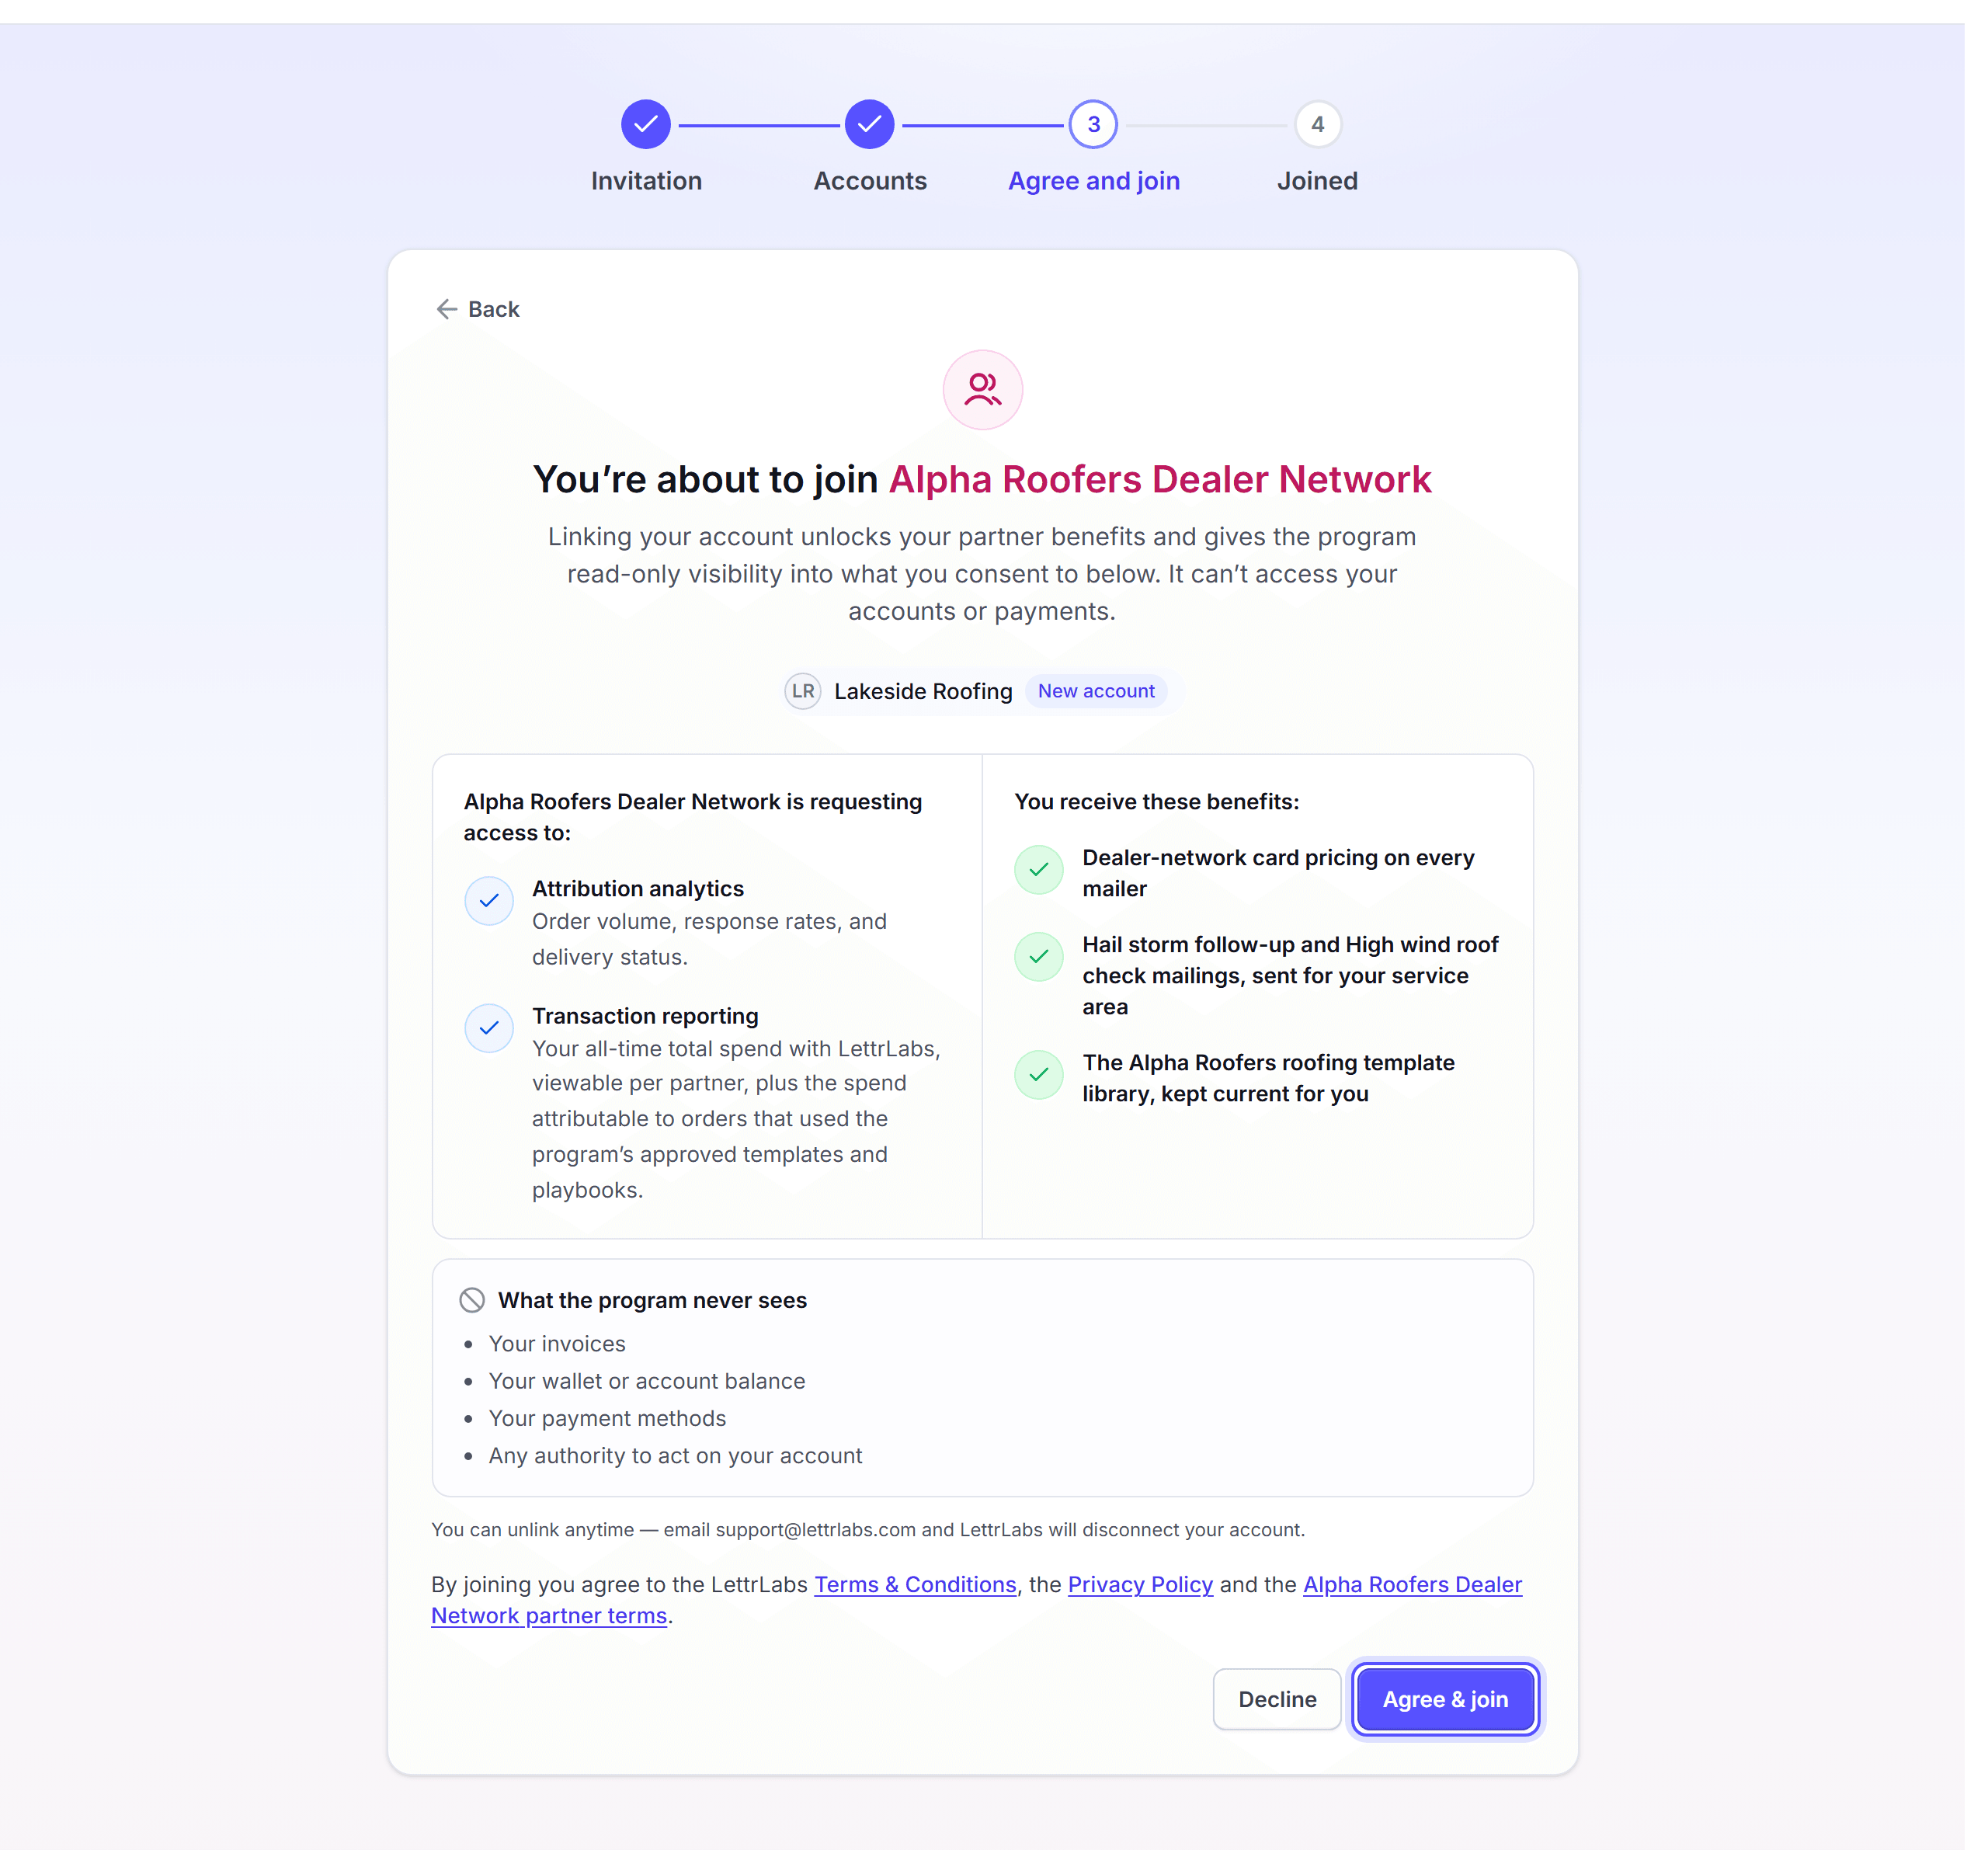
Click Agree & join. To stop, click Decline.
The program never sees your invoices, your balance, your payment methods, or any authority to act on your account. When you click Agree & join, you agree to the LettrLabs Terms & Conditions and Privacy Policy. You also agree to the partner terms of the program, when it has them.
You're done when the page reads "You’re in". LettrLabs sends a welcome email. Decline shares nothing, and the link stays valid.
See or leave your partner programs
Check which programs your accounts joined and what each one can see. You can also change your partner ID, or leave a program.
Click the account card at the foot of the sidebar, then click Partner programs. The Partners page opens.
Read each program row. It shows the account, the date it joined, the partner ID and the grants.
To change the partner ID, click Edit. Enter the ID, then save. An ID can have up to 60 characters.
To leave a program, click Leave. Then click Leave program in the dialog.
You're done when the program leaves the list. The page lists only the accounts you administer.
Read your program snapshot
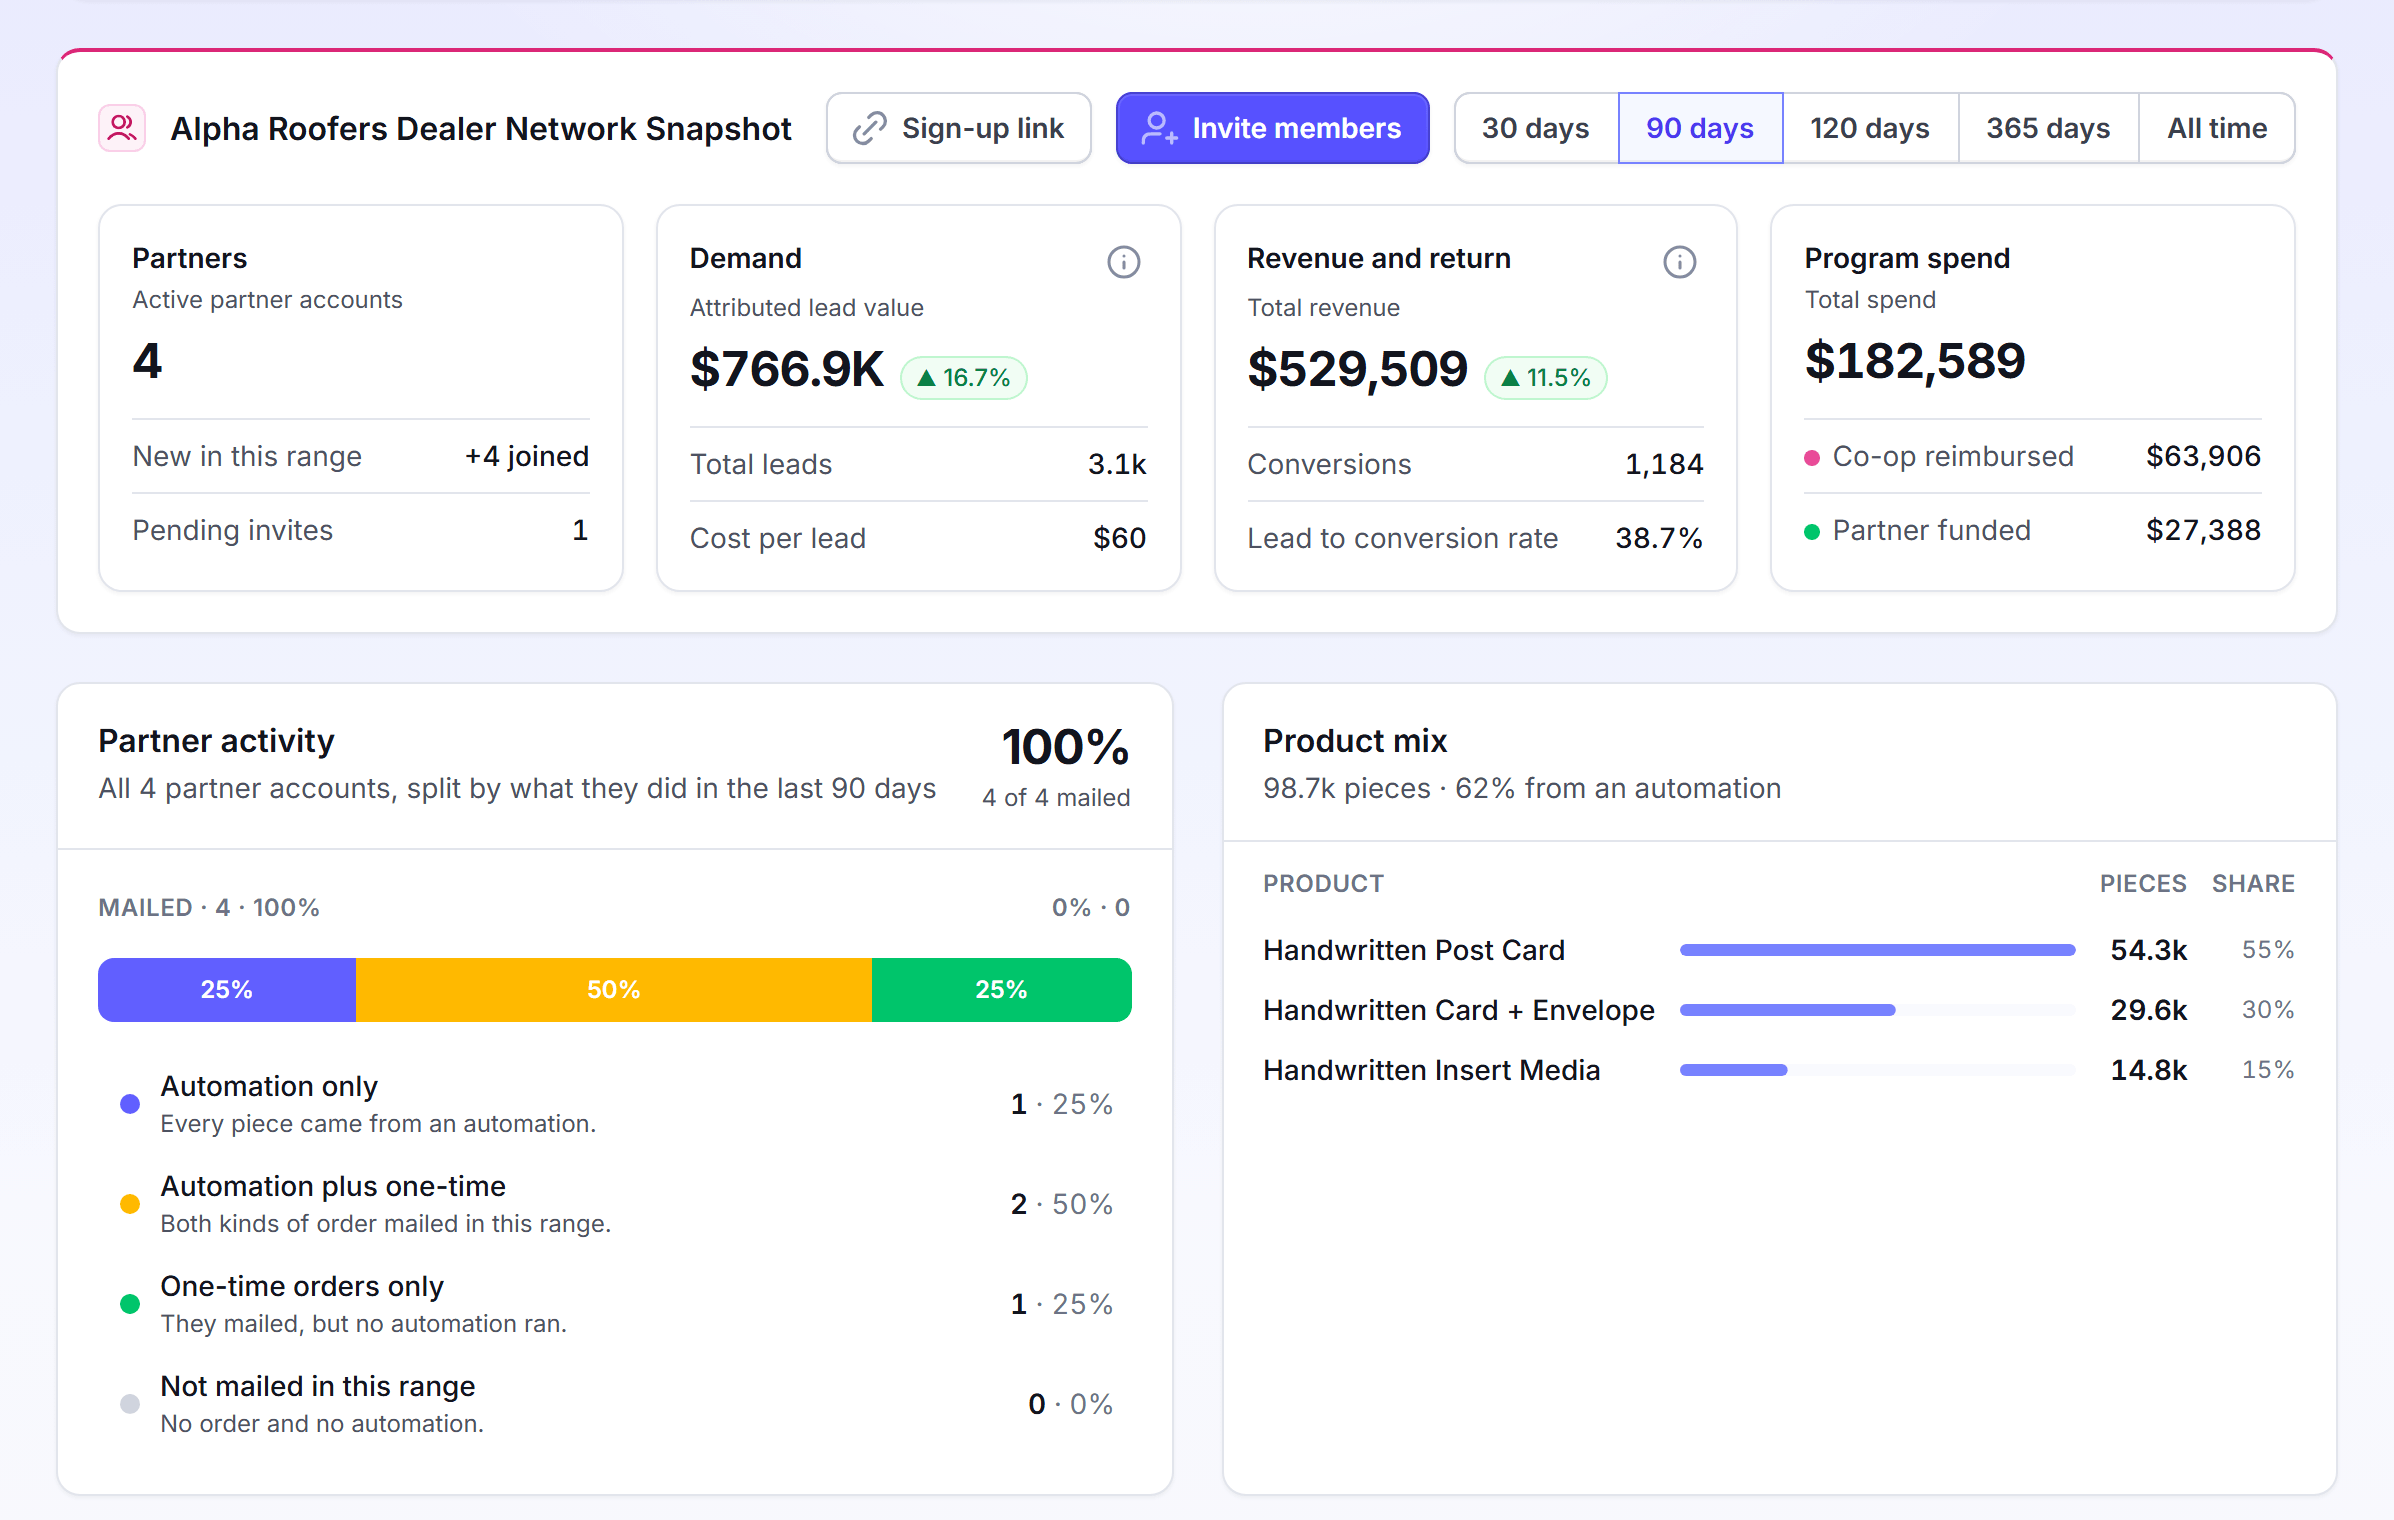
The snapshot is the home page of the Partner Program app. Read it to see how the program performs.
Click Switch app, then click Partner Program. The Home page opens on the snapshot.
Select a range: 30 days, 90 days, 120 days, 365 days or All time.
Read the four cards: Partners, Demand, Revenue and return and Program spend.
Optional: Under Spend by account, search for an account, or click Export.
Partner activity puts each account in one state: Automation only, Automation plus one-time, One-time orders only or Not mailed in this range. To copy the public sign-up link, click Sign-up link. Only a program admin sees Sign-up link.
You're done when the cards show the figures for the range you picked.
Manage program members
Program members are your own team, not your partners. An admin manages partners and members. A user reads the program reporting.
You need the invite permission to invite a member.
In the Partner Program app, click Settings, then click the Members tab.
Click Invite member.
Enter an Email address and select Admin or User. To add more people, click Add another.
Click Send invites.
To change a member, click the actions menu on the row. Then click Make admin, Change to user, Resend invite or Remove from partnership. The program keeps at least one admin, so you cannot demote or remove the last admin.
You're done when the message "Invitation sent" shows. The new member shows as Pending until they accept.
Invite and manage partners
Invite a partner when a dealer must join your program. The person you invite picks which of their accounts join. The program never picks accounts for them.
In the Partner Program app, click Partners.
Click Invite partner.
In Send to email, enter the email of the person, for example partner@company.com.
Click Send invitation. The dialog Invitation sent shows the link.
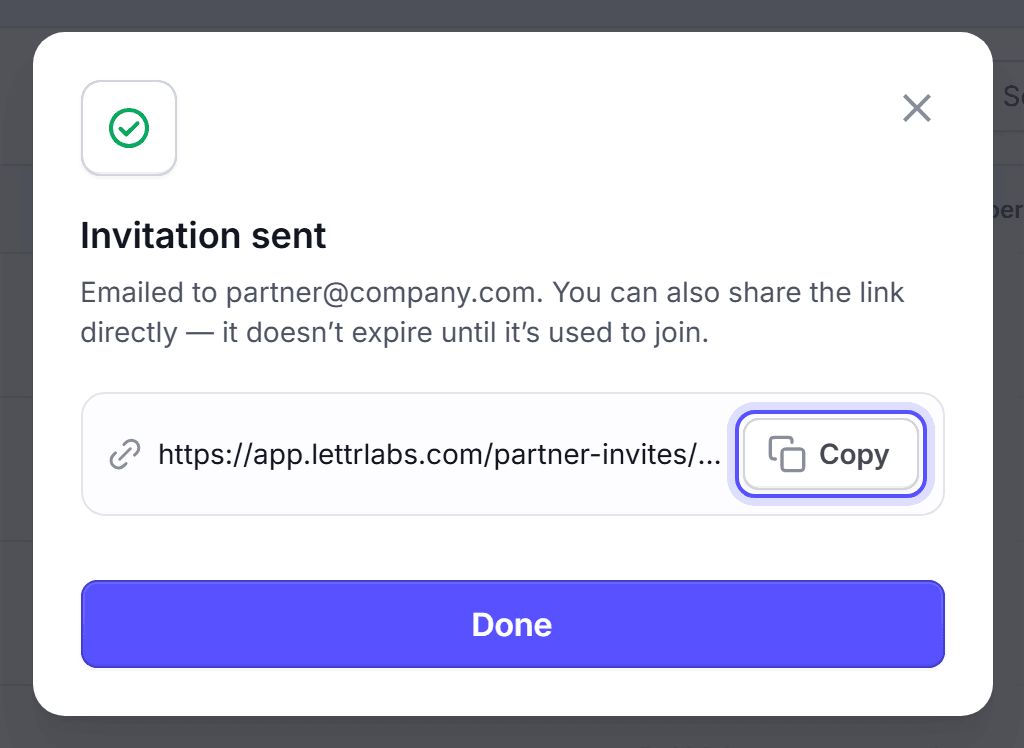
Optional: Click Copy to share the link yourself. Then click Done.
Anyone with the link can use it to join, and the link stays valid until it is used. The Partners page has three tabs.
| Tab | What you can do |
|---|---|
| Accounts | See each partner account. Resend the invitation, edit the partner ID, or click Remove from program. |
| Members | See each person in the partner accounts, with the Role, Status and Last login. Click Resend on a pending person. |
| Invitations | See each invitation as Issued, Accepted or Revoked. Resend or revoke an Issued invitation. |
You're done when the invitation shows as Issued on the Invitations tab. It changes to Accepted when the partner joins.
Author a playbook
A playbook is a ready-made automation that each partner account can launch as its own. You build it with the same questions that a dealer sees in Send Mail.
In the Partner Program app, click Playbooks, then click New Playbook.
In the Playbook panel, enter the Playbook name and the Description. Select the Strategy and the Use case.
Under Who can use this playbook, select All partner accounts or Specific accounts.
Fill in each step of the campaign. On each section, open the Section policy menu. Leave it Open, click Lock section, or click Set bounds.
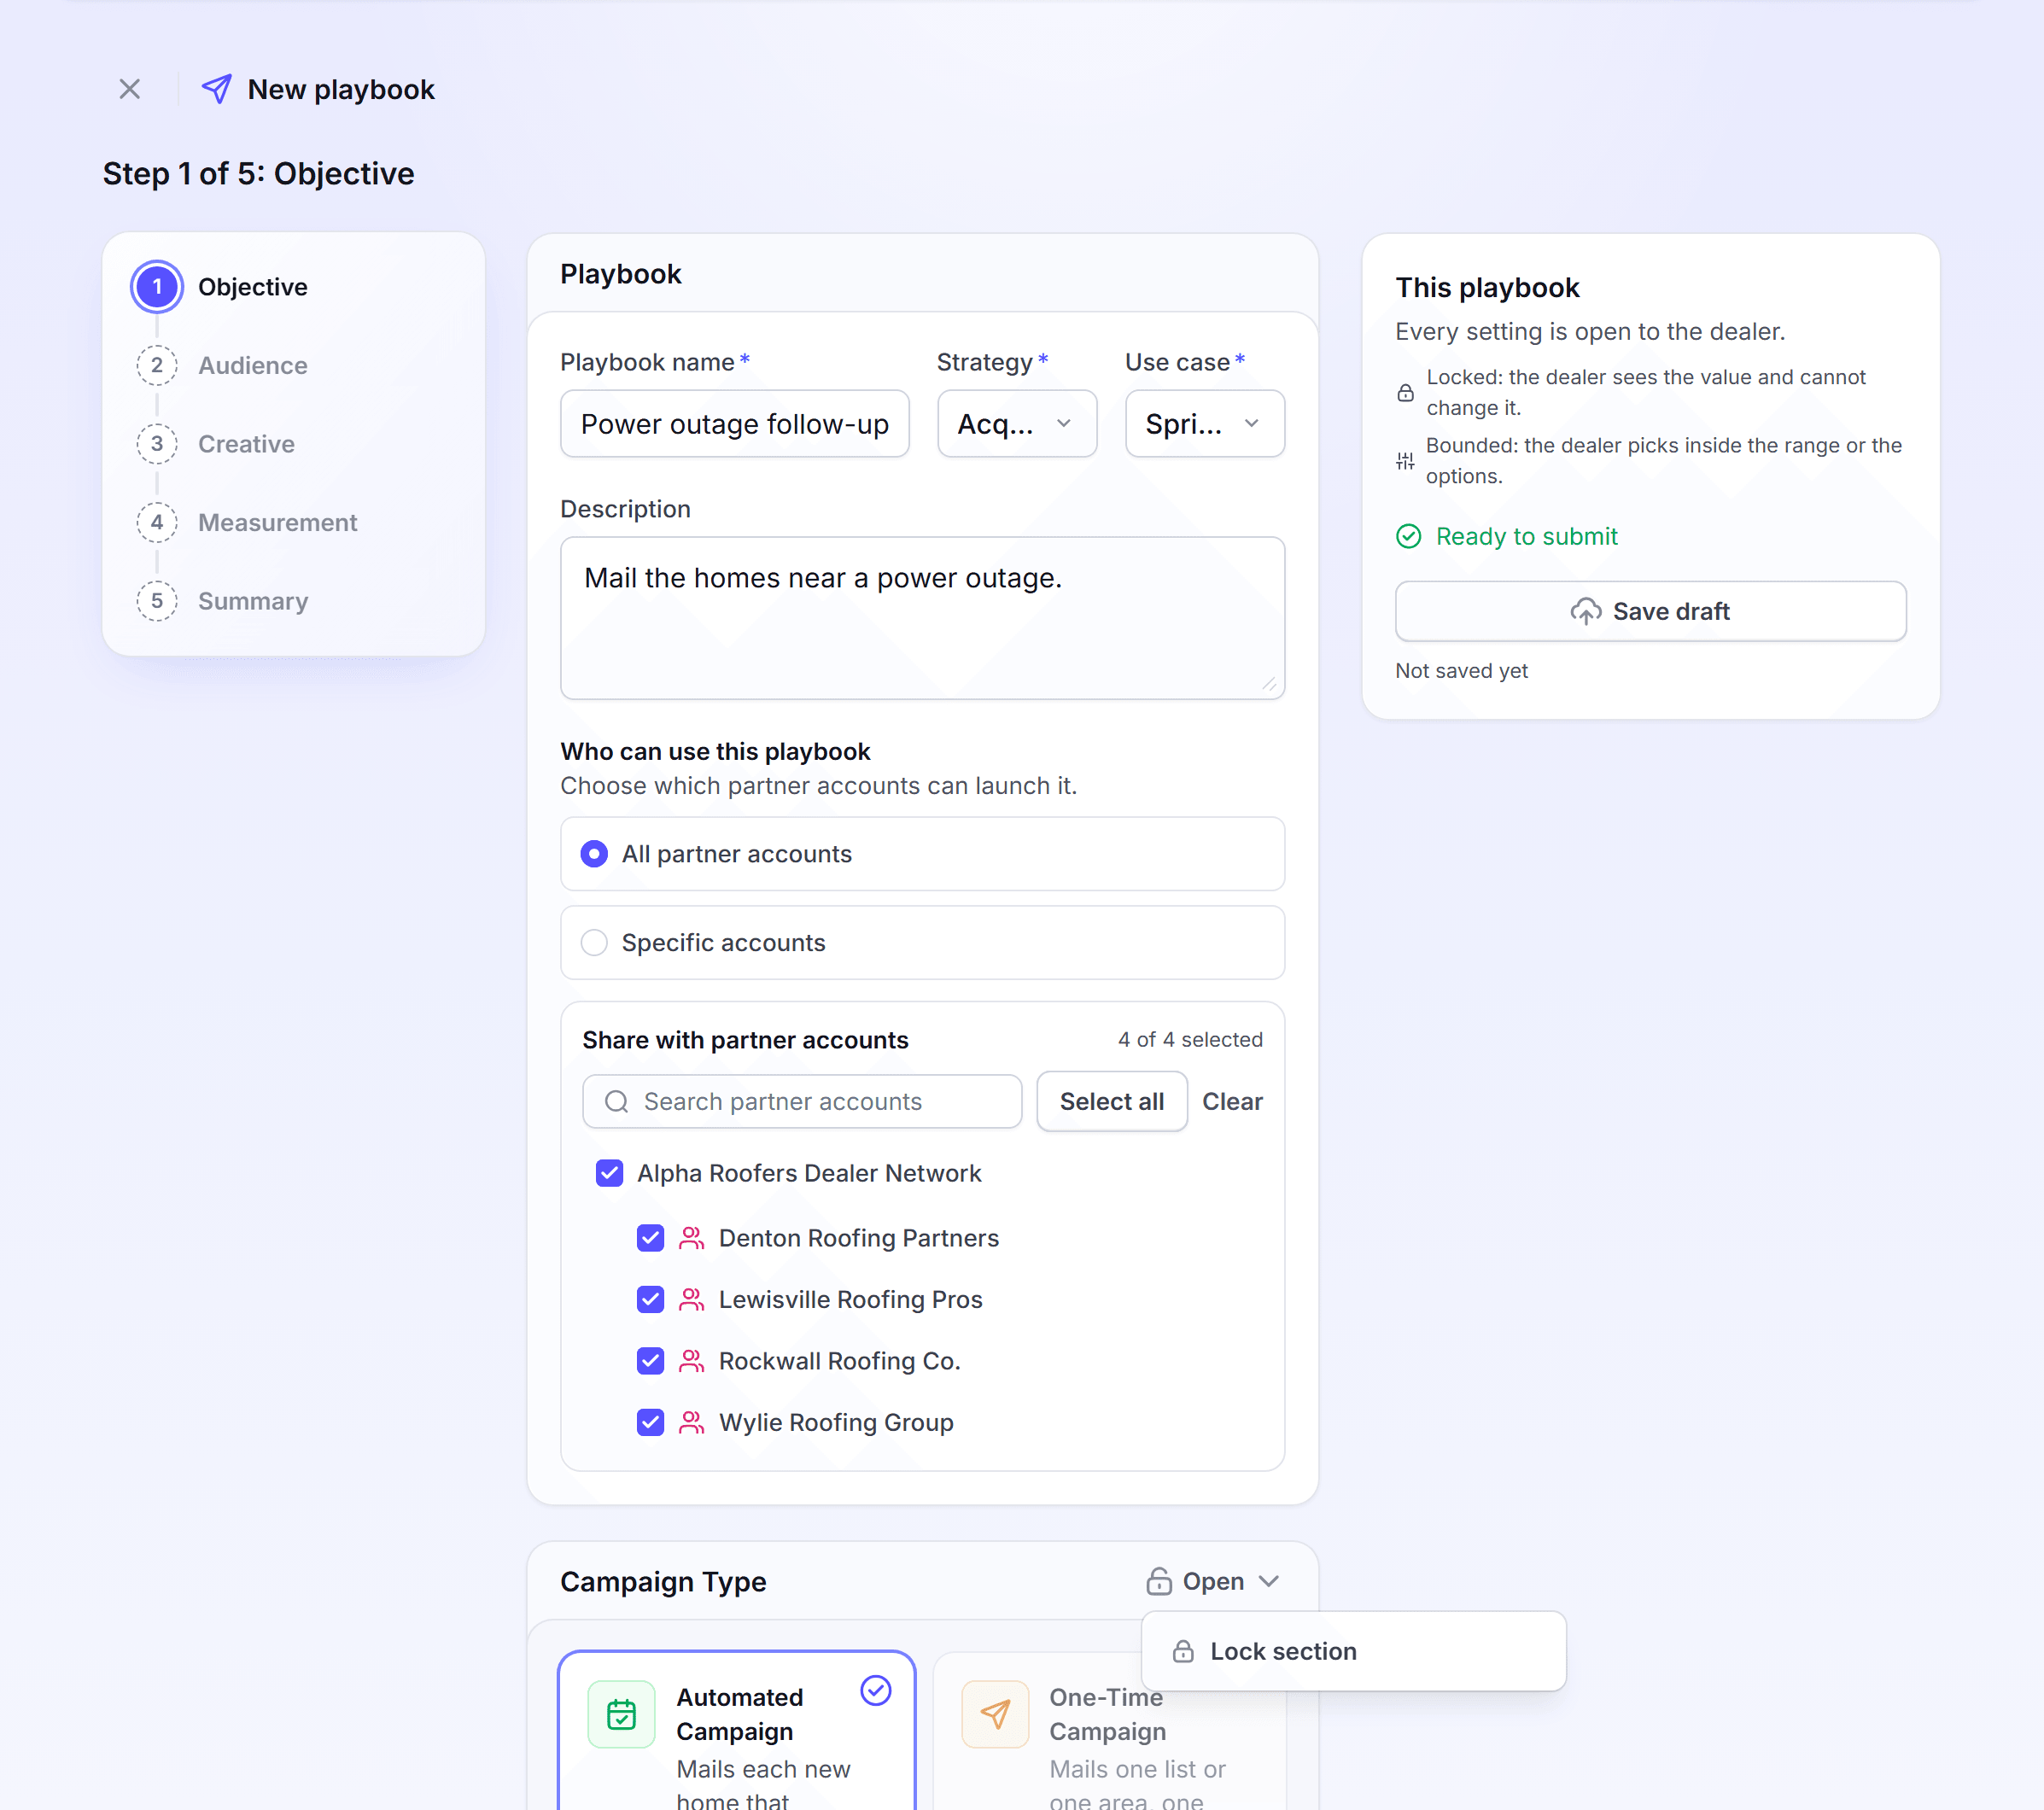
Click Save draft to save your work.
On the summary step, click Submit for approval.
Open lets the dealer change the answer. Locked keeps your answer. Bounded lets the dealer pick inside the limits you set. The rail lists each problem under Before you submit.
A section holds a lock or a bound, not both. A lock or a bound on a section locks each section above it. When you lock or bound a section below a bound, the dialog Remove the bound? opens. Click Remove and apply to remove the bound above. Each section keeps its value. A locked section that still holds a bound shows Remove the bound in its Section policy menu.
You're done when the message Submitted for approval shows. The playbook shows as Pending in the library.
Approve, retire or delete a playbook
A playbook reaches partner accounts only after a person approves it. The actions depend on the status of the playbook.
Click Playbooks. To find a playbook, use Search or the status filter.
On a Pending playbook, click Approve. The Edit playbook dialog opens.
Check the details and who can use it. Then click Approve playbook.
The other actions are in the card menu.
| Action | Statuses | What it does |
|---|---|---|
| Edit | Draft, Pending, Approved | Opens the playbook to change it. |
| Duplicate | All | Makes a copy. Use it to bring back a retired playbook. |
| Retire | Approved | Accounts stop seeing it. Running automations continue. |
| Delete | Draft, Pending | Removes it from your library. |
| Unapprove | Approved | Not available when a launch of the playbook is live. A tooltip gives the reason. |
You're done when the card shows the new status, for example Approved.
Download the weekly reimbursement file
The reimbursement file lists each partner order and the co-op amount it can earn. One file closes each Friday. You must be a program admin to open Reporting.
In the Partner Program app, click Reporting.
Under Weekly reimbursement reports, find the week. The running week reads Period in progress.
Click View to read the rows. In the file view, you can filter the rows and click Download CSV.
Or click the download icon on the row to download the file.
Each row shows Partners, Total spent, Potential reimbursement and Unreimbursable spend. The reimbursement rate shows in Settings on the Reimbursement tab.
You're done when the CSV file is in your downloads.
Set up your partner onboarding page
The onboarding page is what a new partner sees at your sign-up link. Set it up before you share the link.
In the Partner Program app, click Settings, then click the Onboarding tab.
Under Public sign-up link, turn on the toggle. Click Copy link to share it, or Preview live page to see it.
Under Partner logo, upload the Full logo and the Icon logo (1:1).
On each step card, click Edit, change the text, then click Save. The cards are Sign-up page, Create account, Confirmation and Welcome email.
Optional: Under Who can join, select Restrict who can join. Then click Save changes.
Optional: Under Eligibility rules, click Add rule. Allow an account by its Profile ID, or allow an Email domain.
A rule never lets an account join on its own. The account still needs the link and must give its consent. Under Open, LettrLabs keeps the rules but does not apply them.
To rename the partner ID or the unit of work, click the Context tab. Click Edit on Partner unique ID or Unit of work, then click Save. The partner unique ID can have up to 60 characters.
You're done when the message "Saved. The live sign-up flow now uses this copy." shows.
FAQ
Related
Playbooks
Launch a playbook that a program shared with you.
Organizations
Run mail for many accounts from one organization.
Work across accounts
Switch between your accounts and apps.
Steps checked 2026-11-16.